Learn how to safely replace a kitchen extractor fan motor with step‑by‑step instructions, tools list, wiring tips, motor type comparison, and troubleshooting FAQs.
DIY Fan Motor Swap – Simple Guide for Homeowners
DIY fan motor swap is the process of replacing the motor inside an extractor or bathroom fan yourself. When tackling DIY fan motor swap, a hands‑on method to restore airflow, many homeowners also work with fan motor, the electromechanical component that drives the fan blades and extractor fan, the ceiling or wall‑mounted unit that expels stale air from kitchens and bathrooms. This DIY repair, a practical approach to fixing home appliances without a technician can save you time and money. DIY fan motor swap encompasses fan motor replacement, DIY fan motor swap requires basic tools, and extractor fan performance depends on motor condition. Understanding these links helps you plan a smooth swap and avoid costly mistakes.
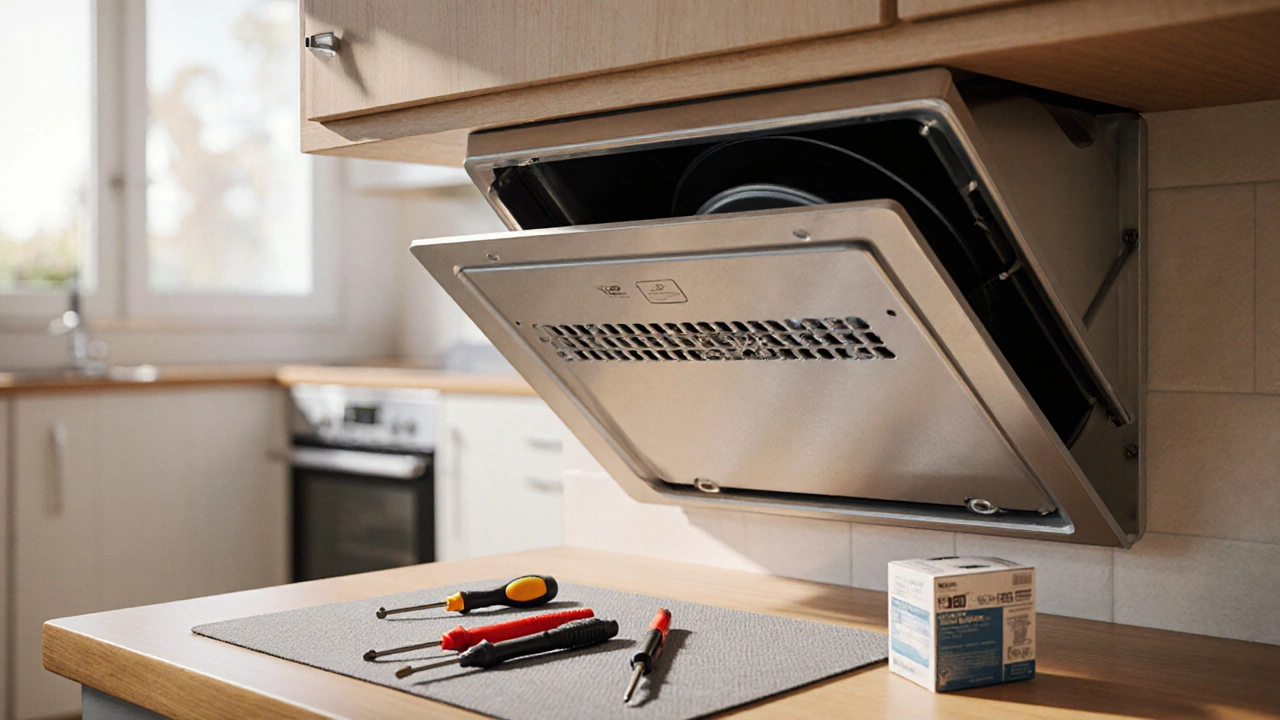
Tools and Safety Checklist
Before you open any fan, gather a screwdriver set (Phillips and flat‑head), a torque screwdriver, a multimeter, a pair of needle‑nose pliers, and a fresh replacement motor that matches the original voltage and size. Safety starts with turning off power at the circuit breaker and confirming the fan is truly dead using a multimeter. Wear insulated gloves and keep a flashlight handy for tight spaces. Write a quick checklist: 1) Power off, 2) Verify no voltage, 3) Photograph original wiring, 4) Label wires if needed, 5) Have the new motor ready. This checklist turns a potentially risky job into a systematic routine.
Once you’ve secured the area, remove the fan’s outer grille—usually a few screws or clips. With the grille off, you’ll see the motor mounting bracket. Detach any wiring connectors, noting their positions (the photos you took help). Unscrew the motor from its bracket; most units are held by two or three bolts. Pull the old motor out gently; dust and debris often accumulate, so a quick vacuum can prevent future issues. Compare the new motor’s dimensions, shaft size, and wiring diagram to the old one to ensure a perfect fit.
Installing the new motor follows the reverse order. Place it on the bracket, align the shaft, and tighten the bolts to the manufacturer’s torque specification (often around 2‑3 Nm). Re‑connect the wiring using the same pins or terminals you labeled earlier. Double‑check that all connections are tight and that no stray wires are touching metal parts. Snap the grille back on, secure the screws, and restore power. Turn the fan on; you should hear a smooth, steady hum and feel airflow within a few seconds. If the fan stalls or makes unusual noises, shut it off immediately and re‑inspect the mounting and wiring.
Even with a careful approach, some hiccups are common. Motor polarity is a frequent mistake—reversing the wires can make the fan spin backward or not at all. Another pitfall is over‑tightening the mounting bolts, which can warp the motor housing and cause vibration. Lastly, neglecting to clean the fan’s blades and housing before re‑assembly often leads to reduced performance or premature wear. Address these issues head‑on by double‑checking polarity with a multimeter, using a torque‑limiting screwdriver, and giving the whole unit a good wipe down. With these safeguards in place, you’ll finish the swap confidently and enjoy restored airflow.
Now that you’ve got the basics—tools, safety steps, the exact swap process, and common pitfalls—you're ready to dive into the detailed guides below. Each article breaks down a specific scenario, from kitchen extractor fans that stopped working to bathroom fans that need a fresh motor. Browse the collection to find the exact match for your fan model and get the actionable advice you need to finish the job right.