Refrigerator Failure Diagnostic Tool
Diagnose Your Fridge Issue
Select the symptoms you're experiencing to identify the most likely failed component and whether it's a DIY fix.
Diagnostic Result
When your fridge starts acting up, the first question is usually “what’s broken?” Most issues boil down to a handful of parts that wear out or get clogged over time. Knowing which component typically fails lets you diagnose quickly, decide whether you can DIY the fix, and avoid costly service calls.
Quick Takeaways
- The compressor and its start relay are the heart of cooling - a noisy or dead compressor usually means professional repair.
- A faulty thermostat or temperature sensor often shows up as inconsistent temperatures.
- Dirty condenser coils cause overheating and higher energy use.
- Worn door gaskets let warm air in, making the fridge run constantly.
- Ice‑maker problems, stuck evaporator fans, or a busted defrost timer create frost buildup and uneven cooling.
Armed with this cheat sheet, you can move straight to the symptom checklist and pinpoint the culprit.
Meet the Main Players in a Refrigerator
Refrigerator is a household appliance that removes heat from an insulated compartment to keep food fresh at low temperatures. Modern units combine a sealed refrigerant loop, electronic controls, and a series of safety components to maintain a steady 35‑40 °F (2‑4 °C) in the fridge and 0‑5 °F (-18‑-15 °C) in the freezer.
Each of the following parts can fail, and each failure shows a characteristic set of signs.
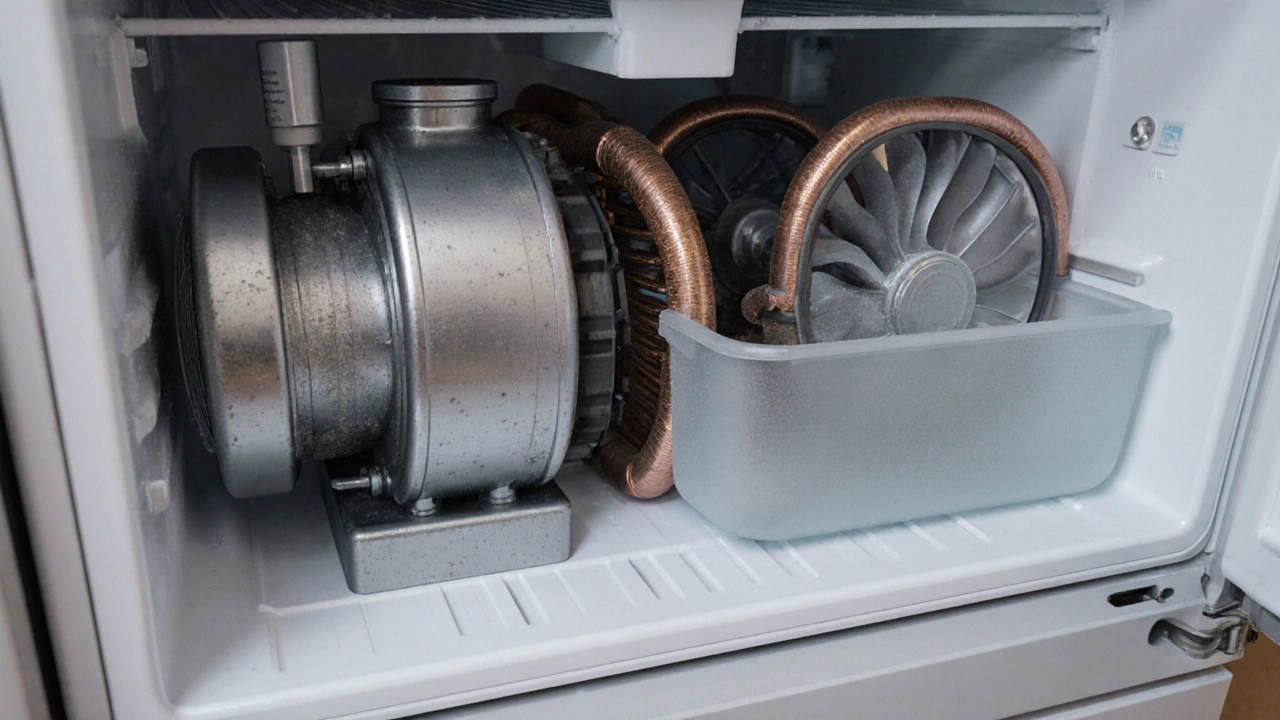
1. Compressor - The Cooling Engine
The compressor compresses the refrigerant vapor, raising its pressure and temperature so it can release heat in the condenser. When the compressor sputters, clicks, or refuses to start, the entire cooling cycle stops.
Typical failure signs:
- Complete loss of cooling in both fridge and freezer.
- Loud buzzing or clicking noises that cease after a few seconds.
- Burnt‑smell near the back of the unit.
Most homeowners cannot replace a compressor safely; it requires a certified technician because the refrigerant is sealed and high‑pressure.
2. Start Relay & Overload Protector
The start relay supplies the initial surge of electricity to spin the compressor. A defective relay will make the compressor try to start repeatedly, leading to a humming sound followed by a quick shut‑off.
Diagnostic tip: locate the small rectangular relay on the side of the compressor, pull it out, and give it a gentle tap. If the compressor kicks in, the relay is likely the problem.
Replacement cost is usually under $30 and can be swapped with a screwdriver.
3. Thermostat (or Digital Temperature Sensor)
The thermostat tells the control board when to turn the compressor on or off. An inaccurate thermostat can cause the fridge to run constantly or cycle off too early.
Symptoms:
- Fridge temperature fluctuates wildly (e.g., 30 °F one hour, 45 °F the next).
- Ice buildup in the freezer despite a normal setting.
Older models use a bi‑metal thermostat you can test with a multimeter for continuity. Newer units have a thermistor; swapping the sensor is usually a quick job.
4. Evaporator Fan - Air Circulation Inside
Inside the freezer compartment, the evaporator fan blows cold air across both the freezer and fridge sections. When the fan motor fails, the freezer may stay cold while the fridge warms up.
Check:
- Listen for a whirring sound when the freezer door is closed.
- Feel for airflow at the vent opening in the fridge section.
If silent, the fan blade may be obstructed by ice. Defrosting manually can reveal a broken motor that needs replacement.
5. Condenser Coils - Heat‑Rejecting Fins
Located on the back or beneath the refrigerator, condenser coils dissipate heat from the compressed refrigerant. Dust, pet hair, and debris act like a blanket, causing the compressor to overheat and shut down.
Cleaning routine:
- Unplug the fridge and pull it away from the wall.
- Use a coil brush or soft vacuum to remove debris.
- Wipe the fins with a damp cloth.
- Replace the access panel and restore power.
Regular cleaning (every 6‑12 months) can prevent many cooling issues.
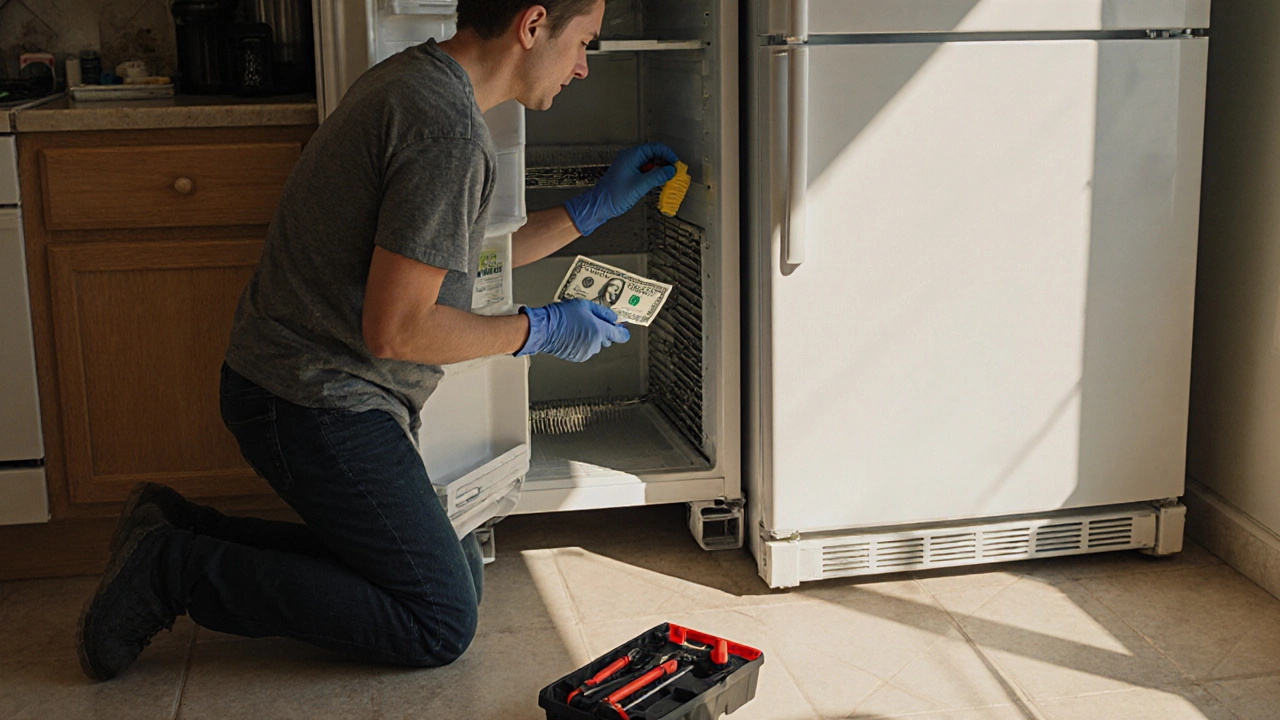
6. Door Gasket - The Seal That Keeps Warm Air Out
The rubber gasket around the fridge and freezer doors ensures a tight seal. Cracks, tears, or loss of flexibility let warm air infiltrate, forcing the compressor to work harder.
How to test:
- Close the door on a dollar bill. If you can pull it out easily, the seal is weak.
- Inspect for cold spots or moisture on the gasket.
Replacement is inexpensive (about $15‑$25) and involves removing the old gasket and clipping in a new one.
7. Defrost Timer / Defrost Heater - Managing Frost
Automatic defrost systems cycle a heater on the evaporator coil to melt frost. If the timer fails, frost can build up, blocking airflow and causing the freezer to warm.
Common signs:
- Ice coating the back wall of the freezer.
- Water pooling at the bottom of the fridge.
Testing the timer with a multimeter for continuity, or simply advancing it manually (usually by pressing a recessed button), can confirm the fault. Replacing the timer or heater is a modest DIY job.
8. Ice Maker - Frozen Water Supply
Ice makers rely on a water inlet valve, a thermostat, and a motor. A clogged filter or a failed valve can stop ice production.
Simple fixes:
- Check the water line for kinks.
- Replace the inlet filter (often an inexpensive cartridge).
- Test the valve with a multimeter; replace if no continuity.
9. Control Board - The Brain of the Fridge
Modern refrigerators use a printed circuit board to manage temperature sensors, fans, and defrost cycles. Signs of a board failure include random error codes, erratic cooling, or the unit refusing to power on.
Because boards are expensive (often $150‑$300) and require precise soldering, most homeowners opt for professional diagnosis before swapping.

Symptom‑to‑Component Checklist
| Symptom | Likely Failed Part | DIY Fix? |
|---|---|---|
| No cooling at all | Compressor or start relay | No (requires technician) |
| Fridge warm, freezer cold | Evaporator fan | Yes (replace fan) |
| Frost buildup on evaporator | Defrost timer or heater | Yes (replace timer/heater) |
| Running constantly, high energy bill | Dirty condenser coils or bad door gasket | Yes (clean coils, replace gasket) |
| Ice maker not filling | Water inlet valve or clogged filter | Yes (replace valve/filter) |
| Erratic temperature swings | Thermostat/sensor or control board | Thermostat - Yes; Board - No |
Step‑by‑Step Diagnosis Guide
- Unplug the refrigerator for safety.
- Visually inspect the back for dust on condenser coils; clean if needed.
- Check the door gasket with the dollar‑bill test; replace if compromised.
- Listen for the evaporator fan when the freezer door is closed; replace if silent.
- Open the rear panel and locate the start relay; tap gently and watch for compressor start.
- Use a multimeter to test continuity on the thermostat, start relay, and defrost timer.
- If all components test good, note any error codes on the display and consult the user manual for the control board meaning.
- Re‑assemble, plug back in, and monitor temperature for 24 hours.
Following this order saves time because the easiest, most common failures (dirty coils, bad gasket, and stuck fan) are addressed first.
When to Call a Professional
Even seasoned DIYers hit a wall when the problem involves sealed refrigerant, high‑voltage components, or expensive control boards. Call a certified technician if:
- The compressor does not start after checking the start relay.
- You detect refrigerant leaks (oil spots or hissing sounds).
- Multiple components appear faulty, indicating a broader electrical issue.
- Your unit is still under warranty - tampering could void coverage.
Preventive Maintenance Checklist
- Clean condenser coils every 6 months.
- Wipe interior shelves weekly to prevent mold.
- Inspect door gaskets monthly; apply a silicone spray if they look dry.
- Run a quick “defrost” cycle if you notice any frost on the freezer wall.
- Check the water line and ice maker filter quarterly.
- Level the fridge properly; an uneven unit stresses the compressor.
Following these steps keeps the most failure‑prone parts in good shape and reduces the need for emergency fridge repair calls.
Frequently Asked Questions
Why is my fridge making a clicking noise?
A clicking sound usually means the start relay is trying to power the compressor but failing. Tapping the relay can sometimes free a stuck contact, but most often the relay needs replacement.
My freezer is icy, but the fridge stays warm. What’s wrong?
Ice buildup on the evaporator blocks airflow. Check the defrost timer or heater first; if they’re faulty, the ice won’t melt, leaving the freezer cold and the fridge warm.
How often should I clean the condenser coils?
Aim for every six months, or sooner if you have pets that shed. A dusty coil forces the compressor to run longer, raising energy costs.
Can I replace the thermostat myself?
Yes, on most models the thermostat is a simple plug‑in part. Disconnect power, note the wiring configuration, swap the old part, and test for continuity before re‑installing.
What should I do if the compressor is hot to the touch?
A hot compressor often signals that the condenser coils are dirty or that the overload protector has tripped. Clean the coils, let the unit cool, and if the compressor still overheats, call a technician-replacing a compressor involves handling refrigerant.