Washing machines have revolutionized our daily chores, making life simpler and more convenient. However, like all machines, they require maintenance and can occasionally face problems. Understanding what usually breaks can help you address these issues swiftly and sometimes even before they happen.
This article delves into the most common washing machine failures, offering insights into what typically goes wrong and how you can fix it. Whether it's a broken belt or a malfunctioning water pump, gaining knowledge about these common issues ensures you won't be left with a basket full of dirty laundry.
- Identifying Common Failures
- Understanding the Drive Belt
- Water Pump Malfunctions
- Troubles with the Lid Switch
- Issues with Draining
- Tips for Preventive Maintenance
Identifying Common Failures
When your washing machine starts acting up, it can throw a wrench into the usually seamless rhythm of home life. While there are many possible reasons for its dysfunction, it's useful to pinpoint what exactly might be causing the issue. Having a fundamental understanding of the moving parts in your machine can save you both time and stress. One of the most frequent culprits when it comes to breakdowns is the machine's drive belt. Over time, this component can become worn or even snap, resulting in a drum that no longer spins. Being aware of a broken belt is crucial, as replacing it is often straightforward and less costly than other repairs. A visual inspection can often confirm if the belt is worn, and many DIY enthusiasts feel confident tackling this repair on their own.
Water pump issues are another common failure. This element of the washing machine is responsible for expelling water after the rinse cycle. If you notice that your clothes are sopping wet after the final spin or if the machine refuses to drain altogether, the water pump might be the cause. Blockages from lint or small clothing items are typical issues, and cleaning out the pump's filter can often resolve these problems. While the task sounds intimidating, it's often a simple process of checking the filter or the hoses leading to and from the pump.
"A stitch in time saves nine," as Benjamin Franklin famously said; the same can be applied to washing machine maintenance. Catching these issues early prevents bigger headaches later on.
The lid switch is another component known to malfunction. If this switch doesn't engage properly, the washing cycle may not start or could abruptly halt as safety protocols stop the drum from spinning. This can often be indicated by a machine that refuses to run unless the lid is securely shut. The switch itself might need adjustment or replacement, and identifying this problem early can spare you from unnecessary worry about the machine's overall health.
Recognizing these typical failures not only empowers you in maintaining your appliance but also gives you the insight to tackle small fixes before they become larger, more expensive problems. Fixing washing machines might sound daunting, but by understanding common issues like these, you’re well on your way to solving them with confidence and ease.
Understanding the Drive Belt
The drive belt in a washing machine plays a crucial role, much like a midshipman guiding the ship's oarsmen. Without it, the entire machine can come to a halt, leaving a pile of laundry forlorn on the floor. This elusive component is responsible for turning the drum, and if it falls into disrepair, you'll likely notice right away when your clothes come out soaking wet or your drum refuses to spin. It's an essential part of the machine’s anatomy that connects the motor to the drum and ensures the washer runs like a well-oiled machine. People often overlook this humble hero of household machinery, but attention to its proper function can make a huge difference in the life of your washer.
What many don't realize is how hardworking this belt actually is. Made of durable rubber material with reinforced fibers, it endures endless cycles of motion and ceaseless degrees of twisting and turning. Despite its resilience, the belt inevitably stretches and wears thin over time, leading to slippage or possibly even snapping. In fact, this is one of the most common washing machine issues found in household appliances today. With research showing that nearly 25% of washing machine problems stem from belt issues alone, understanding how to identify and resolve drive belt troubles is essential knowledge for any homeowner.
A clear signal of a tired belt is when the washing machine makes a screeching or whining noise, often coupled with a refusal to spin. Another clue is if you open the door after a cycle only to find your clothes sitting in a pool of water. This might mean the drive belt has loosened from its intended location. Repairing it isn't as daunting as it sounds. With a few simple tools and some patience, you can save yourself a costly repair bill and a wait for a technician.
According to Jim Smith, an appliance expert with over 30 years of experience, "Most of the time, what you find is that a belt simply needs repositioning or replacement, and that's something that’s very doable for the average person."
Given that the cost of a professional repair can be upwards of $200, a DIY fix starts to sound quite appealing. All you need is a bit of initiative and the right instructions. Begin by unplugging the machine and carefully removing the back panel. This grants access to the internal workings where you can visually inspect the belt for wear or damage. If a replacement is required, ensure you purchase a compatible belt. Typically, manufacturers provide part numbers that make sourcing the proper belt straightforward.
Installing the belt involves careful placement around the motor pulley and drum circumference. It may be necessary to manually rotate the drum to snug the belt into position fully. Some machines may include a tensioner or guide which aids in keeping the belt securely in place. Finishing up requires reattaching the back panel and reconnecting the power. Once completed, run a quick cycle to confirm the repair holds.
For those who like data, consider that replacing a drive belt can contribute to a reduction in environmental impact. Repairing rather than replacing an entire washing machine reduces waste, aligns with sustainability goals, and can extend the appliance's life by several years. It's a seemingly small action that yields a large, positive effect.

Water Pump Malfunctions
The water pump in a washing machine plays a crucial role in the appliance's overall function. Essentially, it is responsible for circulating water throughout the machine during washing and draining cycles, making it an indispensable part of the process. But like many components, water pumps can become problematic over time. Common issues often revolve around blockages, leaks, or mechanical failures. When the pump fails, you might notice water not draining properly or unusual noises emanating from the machine. These symptoms often hint at underlying problems that require attention. Many users are unaware that these issues can sometimes be resolved by simple interventions, saving both time and money on costly repairs.
Recognizing Symptoms of a Faulty Water Pump
First, let's dive into the telltale signs of water pump malfunction. A machine that refuses to drain is a common indicator. This failure can often be attributed to a clogged line or obstruction within the pump mechanism itself. You might also hear an unusual humming or grinding noise during the wash cycle, suggesting that the pump impeller or motor is struggling or has been compromised. In more severe cases, water may start leaking from the bottom of the machine, which indicates a critical issue that could escalate if left unchecked. Proper diagnosis of these symptoms is vital before rushing into hasty conclusions.Addressing the Issue – DIY Tips
If you suspect an issue with the water pump, you can perform a few DIY checks before calling in professional help. Begin by unplugging the machine to ensure safety. Inspect the hoses connected to the pump to see if they are clogged or have any visible kinks. A blocked drainage hose is often the culprit behind inefficient draining. Removing obstructions may involve detaching hoses and cleaning them thoroughly with a wire hanger or similar tool. When tackling a potential water pump problem, always keep an eye out for loose debris that may be lodged within the pump itself.It is not uncommon for blockages to occur internally, requiring a bit more elbow grease to resolve. After detaching the hoses, inspect the pump filter for pieces of clothing, lint, or other debris that may have gotten caught during the wash cycle. Once cleared, reassemble the washing machine, secure all connections, and test the appliance to see if normal functioning has been restored.
"Regular maintenance and prompt attention to unusual noises can extend the life of your washing machine's water pump," says appliance expert John Ramsey. "Understanding the pump's integral role allows you to foresee problems before they disrupt your laundry routine."
When to Seek Professional Help
DIY solutions are effective for minor issues, but there are moments when the involvement of experienced technicians becomes inevitable. If your washing machine still exhibits malfunctions despite your best efforts or if there are signs of electrical issues with the pump motor, it's time to consult with professionals. They possess the necessary tools and diagnostic equipment to pinpoint the problem accurately, ensuring any required component replacements or repairs are carried out effectively.Troubles with the Lid Switch
The lid switch is a small but vital component of your washing machine. Its job is to ensure that the washer only operates when the lid is securely closed. This safety measure prevents accidents and water spillage, but when it malfunctions, it can cause significant headaches. Imagine being in the middle of a laundry routine only to find your machine refuses to spin or agitate. That's a clear sign that something might be amiss with the lid switch. Understanding how to identify and fix this issue is crucial for anyone who relies heavily on their trusty washing machine.
Let's begin by identifying the symptoms of a faulty lid switch. When this component is broken, the washer may not start, or it might stop abruptly during cycles. Sometimes, you might notice that the washer seems to be in a perpetual state of pause. These issues shouldn't be ignored, as they could lead to further complications down the line. Often, the switch could be physically damaged, bent out of shape, or simply misaligned due to the constant closing and opening of the lid.
Repairing the lid switch isn't always as daunting as it sounds, and armed with a bit of knowledge, you might be able to tackle it yourself. Begin by unplugging your washer to ensure safety first. Locate the switch, usually near the hinge of the lid, and inspect it for visible damage. If it appears that the switch or the strike — the part the switch connects with — is damaged or bent, replacement might be necessary. These parts are generally inexpensive and readily available from appliance stores or online.
Washing machine repair doesn't always need a professional hand, especially when addressing minor issues like a broken lid switch. With a little bit of DIY spirit, you might find that such repairs can be both satisfying and a money-saver. However, if you're ever in doubt, reaching out to a professional is always a wise move. According to "Washing Weekly", "A well-maintained washing machine can last up to 15 years, which highlights the importance of routine checks and understanding minor repairs like lid switch replacements."
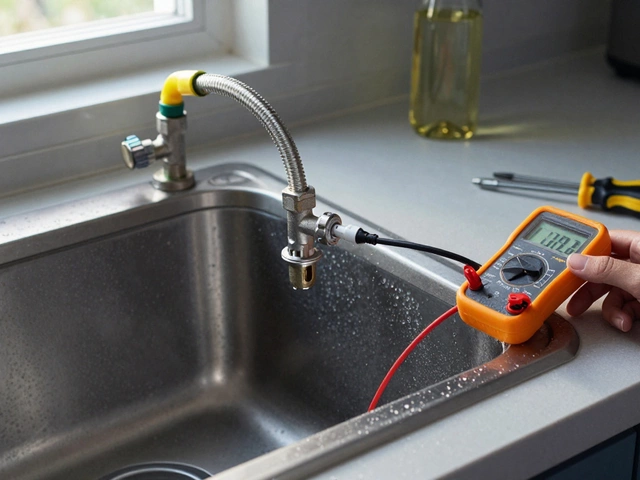
In cases where the lid switch appears intact, but the washing machine still doesn't function, it might be helpful to conduct an electrical test. This involves using a multimeter to verify the continuity of the switch. If this seems out of your comfort zone, it's perfectly reasonable to consult a technician. After all, ensuring the safety of yourself and your appliance is paramount. Regular inspections and understanding the common washing machine issues can prevent expensive repairs and extend the life of your appliance.
Preventive measures also play a role in maintaining the lid switch. Avoid slamming the lid shut, as this can lead to damage over time. Be gentle and encourage others in your household to handle the washer with care. Additionally, regular cleaning can prevent dirt and debris from affecting the lid switch operation. Remember, simple care can lead to seamless washing experiences and fewer disruptions to your routine.

Issues with Draining
One common headache for washing machine owners is when the machine refuses to drain properly. This setback can be infuriating, especially after a cycle completes, and you’re left with a heavy load of soaked clothes. Often, the culprit behind such common washing machine issues is a blocked drain pump or hose. Lint, coins, or even small clothing items can sneak into the system, clogging these essential components. Addressing such problems can also mean checking whether the drainpipe is positioned correctly. If it's pushed too far down the standpipe, this could create a siphoning effect and water might end up back in the drum.
An interesting fact most people don’t know is that using too much detergent can also lead to issues with draining. Excess detergent creates more suds than necessary, which may leave residue on the drum and drainage parts, inviting blockages over time. It’s often suggested by manufacturers to use only high-efficiency detergents and follow the guidelines on the packaging because a build-up of soap operas can sometimes form.
"Regular maintenance can prevent 50% of common washing machine failures," advises Lisa Copperfield, a well-regarded appliance repair specialist.
When dealing with a draining problem, it’s crucial to ensure that the drain hose is not kinked or obstructed. A quick inspection might reveal that simply untwisting the hose or removing debris can solve the drainage problem. Additionally, making a habit of checking pockets for little items before starting a wash helps mitigate the risk of blockage further down the line.
DIY Troubleshooting Steps
If you want to get hands-on with a troublesome washer, begin with unplugging the machine to ensure safety. Next, access the drain pump filter, usually located behind a small panel near the bottom of the machine. Gently turn and remove the filter, being prepared for any water and debris that might spill out. This area generally traps the overlooked items like socks or hairpins. Replace the filter once cleaned and remove any potential obstructions within the visible pump area. Reassemble everything and try a test wash without any clothes to see if draining issues are resolved.
Another environmental factor to consider is the condition of your home’s water drainage system. If your household pipes are sluggish, it might not be the washing machine’s fault. This might be a case for a plumber, as known by many owners who face draining adversities. With these insights, maintaining your washing appliance efficiently doesn’t have to be a chore. By consistently inspecting and cleaning the relevant parts, you can ensure your washer remains in good shape for longer.
Tips for Preventive Maintenance
Keeping your washing machine in tip-top shape requires more than just crossing your fingers and hoping it won't break down. Preventive maintenance is about taking proactive steps to ensure the long-lasting performance of your appliance. Simple actions at regular intervals can make a significant impact. One crucial tip is to regularly inspect the hoses and look for any signs of wear or leaks. Hoses that are cracked or bulging might lead to serious water damage, and replacing them every five years, whether there's visible deterioration or not, can save you from a watery disaster later.
Don’t forget about the lint filter, an easily overlooked component. A blocked filter can restrict your machine’s draining abilities, leading to inefficient washes and strain on the machine's pump, which could necessitate expensive repairs. Get into the habit of cleaning the filter every few washes. It's quick, easy, and can be a game-changer for your machine's health. A cleaner filter means less work for the machine and cleaner clothes for you. You'd be surprised at the difference clean filters make in daily performance.
Balanced loads are another key factor to consider. Overloading your washing machine not only reduces its efficiency but also puts undue stress on its mechanical components. It's essential to consult your machine's manual to understand the recommended load capacity. This not only provides the best washing results but also extends the life of the drum and motor. If you've noticed that your clothes aren't coming out as clean, or if the drum is off-kilter while spinning, reconsider how you're loading it.
The interior and exterior cleanliness of the machine shouldn't be overlooked either. Wipe down the drum and door seals to prevent mildew buildup by leaving the door ajar after washes to let moisture escape. Quarterly, run an empty hot water cycle with a cup of white vinegar or a manufacturer-recommended cleaning solution. This helps in removing detergent residues and keeps your machine smelling fresh and working optimally.
"An ounce of prevention is worth a pound of cure," noted Benjamin Franklin, and this applies to washing machines just as much as it does to public safety. Though it might seem like additional effort, regular maintenance checks can help avert major repairs down the line.Make it a family affair by including kids in the process, teaching them small maintenance tasks. It's a practical lesson in responsibility that pays dividends.
Appliance repair experts often suggest keeping an eye on your machine’s water level settings. These settings are there to match the size of your load and unnecessarily using large water levels on small loads can waste resources and increase wear on the pump. Genius is often in simple habits—match your water level to your load size consistently, and you'll prolong your machine’s life while conserving water.